

How to setup Omada Controller on Kubernetes Cluster
Omada Controller is a centralized network management software developed by TP-Link, designed to manage network devices such as Access Points, Switches, and Routers through a single unified interface. This platform is ideal for environments such as offices, schools, hotels, and other public areas that require efficient and large-scale network control.
In this context, we will deploy the Omada Controller within a Kubernetes cluster. This approach is well-suited for IT teams, DevOps engineers, or home lab enthusiasts who want to manage their networks in a more scalable and cloud-native-friendly manner.
In this tutorial, we are using a TP-Link EAP110 Outdoor V3 wireless access point, which will be managed through the Omada Controller.
Creating a Namespace for Omada Controller
Before creating other resources, we need to create a dedicated namespace so that all Omada Controller components are managed separately and more organized within the Kubernetes cluster. Use the following YAML to create the namespace
$ sudo kubectl create ns 1-omadaCreating PersistentVolume (PV) and PersistentVolumeClaim (PVC) for Omada Controller
To ensure that Omada Controller’s data persists even if the pod is restarted or moved to another node, we need to create a PersistentVolume (PV) and a PersistentVolumeClaim (PVC). Please add the following YAML
$ sudo vi pv-pvc-omada.yaml

apiVersion: v1
kind: PersistentVolume
metadata:
  name: omada-pv
spec:
  capacity:
    storage: 5Gi
  accessModes:
    - ReadWriteOnce
  persistentVolumeReclaimPolicy: Retain
  storageClassName: manual
  hostPath:
    path: /home/andri/omada
---
apiVersion: v1
kind: PersistentVolumeClaim
metadata:
  name: omada-pvc
  namespace: 1-omada
spec:
  accessModes:
    - ReadWriteOnce
  resources:
    requests:
      storage: 5Gi
  storageClassName: manual
$ sudo kubectl apply –f pv-pvc-omada.yamlCreating Deployment and Service for Omada Controller
After the namespace and persistent storage are prepared, the next step is to create a Deployment to run the Omada Controller and a Service to access it within the cluster. In this example, we are using the community image mbentley/omada-controller, which is widely used for running the Omada Controller in a containerized environment.
$ sudo vi deployment-omada.yaml

apiVersion: apps/v1
kind: Deployment
metadata:
  name: omada-controller
  namespace: 1-omada
spec:
  replicas: 1
  selector:
    matchLabels:
      app: omada-controller
  strategy:
    type: RollingUpdate
    rollingUpdate:
      maxSurge: 25%
      maxUnavailable: 25%
  template:
    metadata:
      labels:
        app: omada-controller
    spec:
      containers:
        - name: omada-controller
          image: mbentley/omada-controller:5.14
          imagePullPolicy: IfNotPresent
          ports:
            - containerPort: 8088
              protocol: TCP
            - containerPort: 8043
              protocol: TCP
            - containerPort: 8843
              protocol: TCP
            - containerPort: 29810
              protocol: TCP
            - containerPort: 29811
              protocol: TCP
            - containerPort: 29812
              protocol: TCP
            - containerPort: 29813
              protocol: TCP
          volumeMounts:
            - mountPath: /opt/tplink/EAPController/data
              name: omada-data
            - mountPath: /opt/tplink/EAPController/logs
              name: omada-logs
      volumes:
        - name: omada-data
          persistentVolumeClaim:
            claimName: omada-pvc
        - name: omada-logs
          emptyDir: {}
      restartPolicy: Always
      dnsPolicy: ClusterFirst
      schedulerName: default-scheduler
      terminationGracePeriodSeconds: 30
$ sudo vi service-omada.yaml
apiVersion: v1
kind: Service
metadata:
name: omada-controller
namespace: 1-omada
spec:
type: LoadBalancer
selector:
app: omada-controller
ports:
- name: http
port: 8088
targetPort: 8088
protocol: TCP
- name: https
port: 443
targetPort: 8043
protocol: TCP
- name: https
port: 8843
targetPort: 8843
protocol: TCP
- name: udp29810
port: 29810
targetPort: 29810
protocol: UDP
- name: tcp29810
port: 29810
targetPort: 29810
protocol: TCP
- name: tcp29811
port: 29811
targetPort: 29811
protocol: TCP
- name: tcp29812
port: 29812
targetPort: 29812
protocol: TCP
- name: tcp29813
port: 29813
targetPort: 29813
protocol: TCP$ sudo kubectl apply –f deployment-omada.yaml
$ sudo kubectl apply –f service-omada.yamlCreate TLS Secret for HTTPS
Before creating the Ingress resource for Omada Controller, we need to prepare a TLS Secret that will be used to secure access with HTTPS. In this example, we will create a secret named omada-tls in the 1-omada namespace. If you already have the certificate and key files (e.g., tls.crt and tls.key), you can create the secret with the following command.
$ sudo kubectl create secret tls omada-tls --cert=tls.crt --key=tls.key -n 1-omadaVerify Omada Controller Resources in Namespace
After all resources have been created, make sure everything is running properly. You can check the Deployment, Pod, Service, and other resources in the 1-omada namespace using the following command
$ sudo kubectl get all -n 1-omada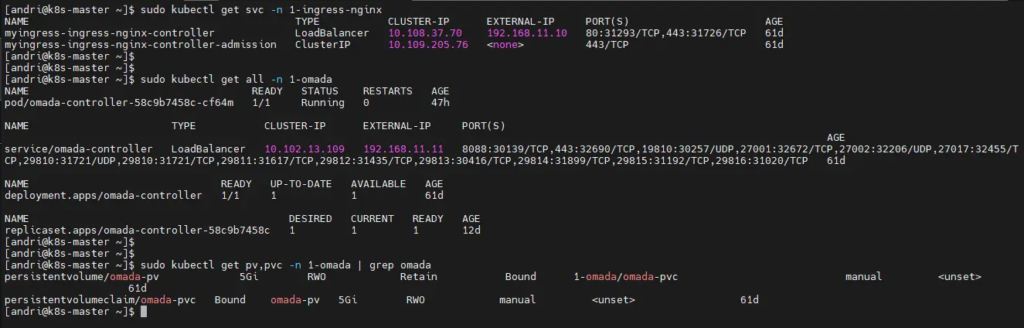
Configuration in the Omada Controller Interface
After completing the Omada Controller Deployment and Service configuration in Kubernetes, the next step is to perform the initial setup through the Omada Controller web interface.
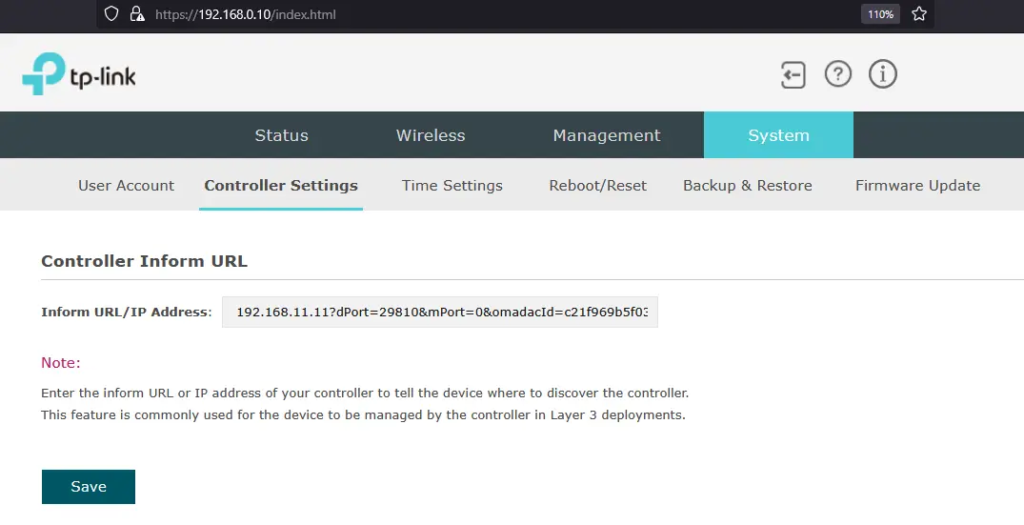
Access the TP-Link EAP 110 Outdoor web browser at https://192.168.0.10, go to the System > Controller Settings menu. Enter the IP address of the Omada load balancer that was configured earlier, which is 192.168.11.11, then click Save
Next Step: Setting Up the Ingress Controller
After the Omada Controller has been successfully deployed through Deployment and Service, the next step is to set up the Ingress Controller so that the service can be accessed from outside the cluster using a hostname and the HTTPS protocol.
In this tutorial, we assume that you already have an Ingress Controller running (such as NGINX Ingress Controller or Traefik). If not, you will need to install it first using Helm or a YAML manifest, depending on the type of Ingress Controller you choose.
$ sudo vi ingress-omada.yaml

apiVersion: networking.k8s.io/v1
kind: Ingress
metadata:
  name: omada-ingress
  namespace: 1-omada
  annotations:
    nginx.ingress.kubernetes.io/backend-protocol: "HTTPS"
spec:
  ingressClassName: nginx
  tls:
    - hosts:
        - omada.inetmede.com
      secretName: omada-tls
  rules:
    - host: omada.inetmede.com
      http:
        paths:
          - path: /
            pathType: Prefix
            backend:
              service:
                name: omada-controller
                port:
                  number: 443
$ sudo kubectl apply -f ingress-omada.yamlAccess Omada Controller Through Browser
After all components are running properly, you can access the Omada Controller through the browser using the domain address configured in the Ingress, https://omada.inetmede.com. Make sure the domain points to the IP of the LoadBalancer from the Ingress Controller, and that the TLS is valid so it can be securely accessed using HTTPS.
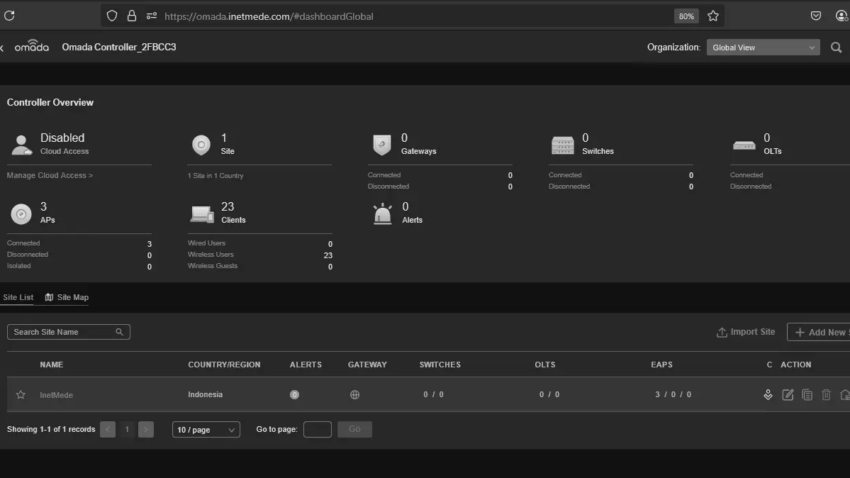
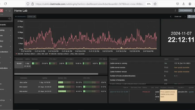
Once the Omada main page is successfully opened, follow the initial setup process such as creating an administrator account, setting the location and timezone, and completing the initial configuration wizard.
Continue with the configuration until you successfully reach the main dashboard page, as shown in the image below.

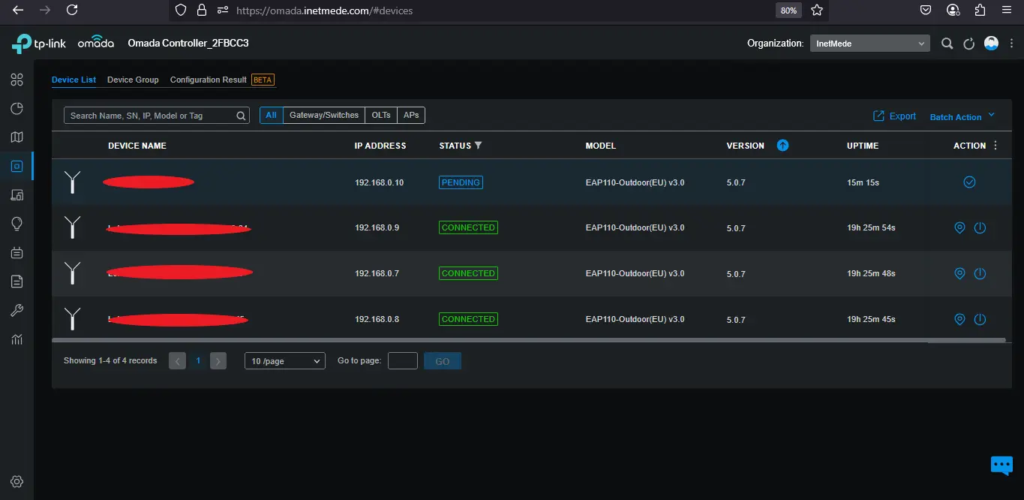
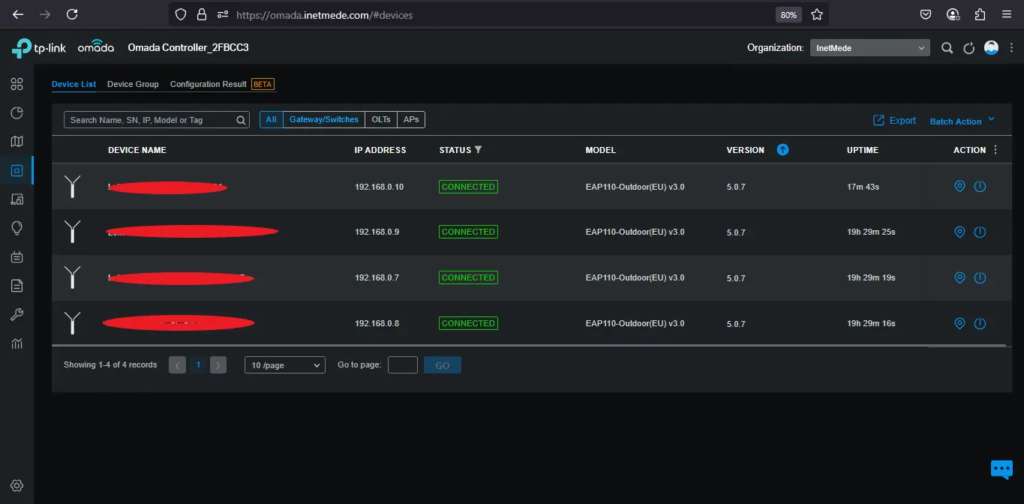
Devices Successfully Detected
After the configuration process is complete, you will be directed to the main dashboard page of the Omada Controller.
In the Devices tab, you will see that the TP-Link EAP110 Outdoor, which was previously configured, now appears in the device list. This indicates that the access point has successfully connected to the Omada Controller and is ready to be adopted and configured further, such as setting up SSID, VLAN, and more
Leave a Reply